
I love atmospheric effects in LEGO photography, but I don’t love the mess they make. Fog machines and aerosols can create gorgeous, moody light rays, but they also leave a sticky residue or an oily film on surfaces and smoke that lingers for so long you have to air out between every single shot. I already own several smoke devices, so I know the trade-offs well.
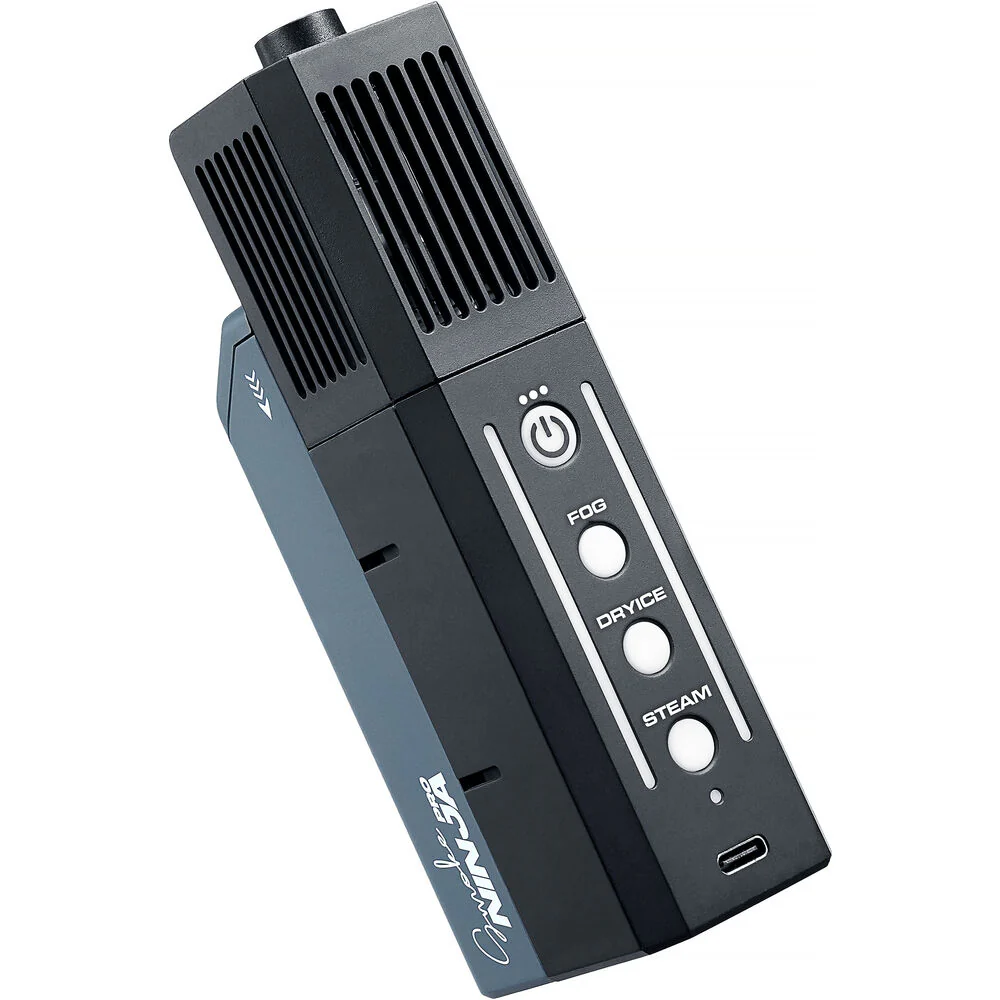
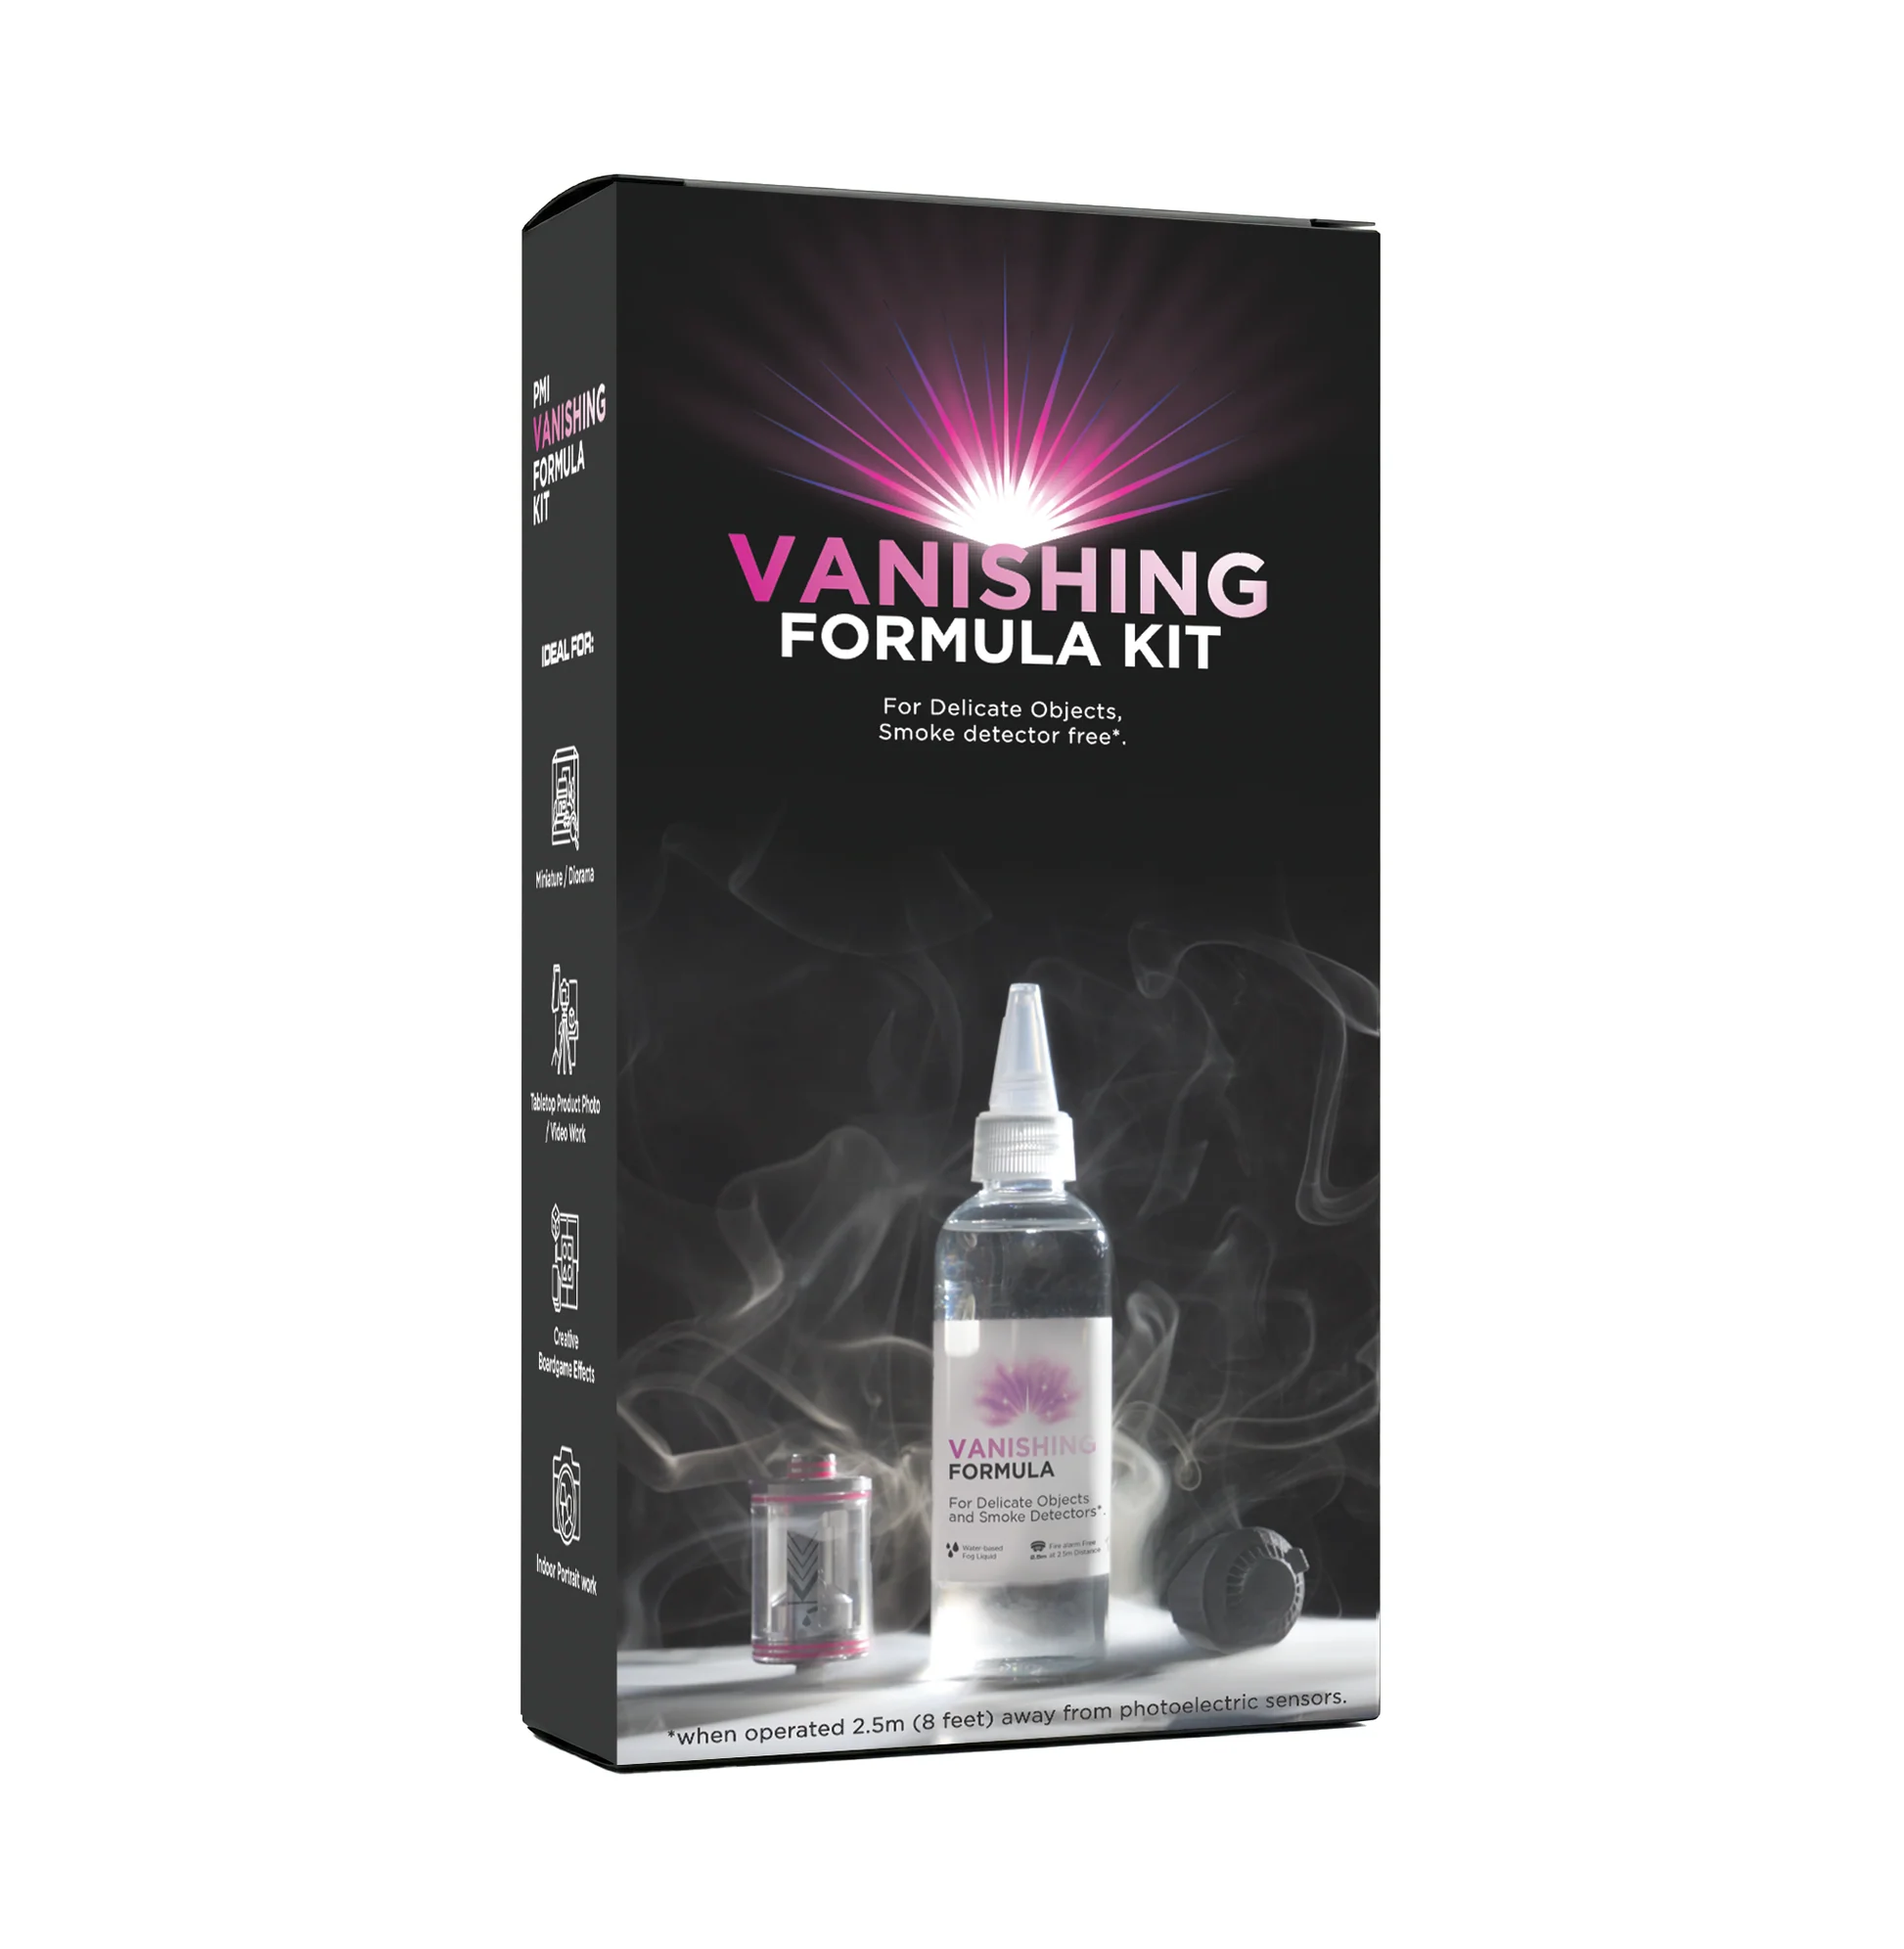
So when PMI Gear reached out to let me test their new Vanishing Formula Kit for the SmokeNINJA Pro, I was game, but skeptical. A fog fluid that disappears without residue, and fast enough that you’re not stuck opening windows every five minutes? That’s a big claim. Here’s how it held up across an actual LEGO photography session.
Blanket of fog with dry ice effect
The first effect I wanted to test was the dry ice look. It’s one of my favorite effects to use in LEGO photography, especially for creating eerie scenes like graveyards, pumpkin patches, or swamps. And from experience, I know that fog juice hugging the tiles and bricks with this effect usually means visible, tactile residue afterward.
So this was the big test for the Vanishing Formula. If my macro lens could capture residue stains after a dry ice effect photo session, it would immediately be game over for PMI Gear.
My first shot was a quick-and-simple setup with the Monster Hunter CMF in a LEGO build. For this one, I used a regular dry ice smoke-shaping nozzle, which is kind of like a foam tube. It goes right into the scene and has to be slowly pulled back out once the fog’s built up.
With the SmokeNINJA Pro set to Dry Ice effect, I set the nozzle directly on the LEGO tiles behind the CMF, took the shot, then went in close with the macro lens to check for residue. None. First test passed.

I wanted to try the dry ice effect again in my next test a few days later, but this time with a wider shot and a different surface.
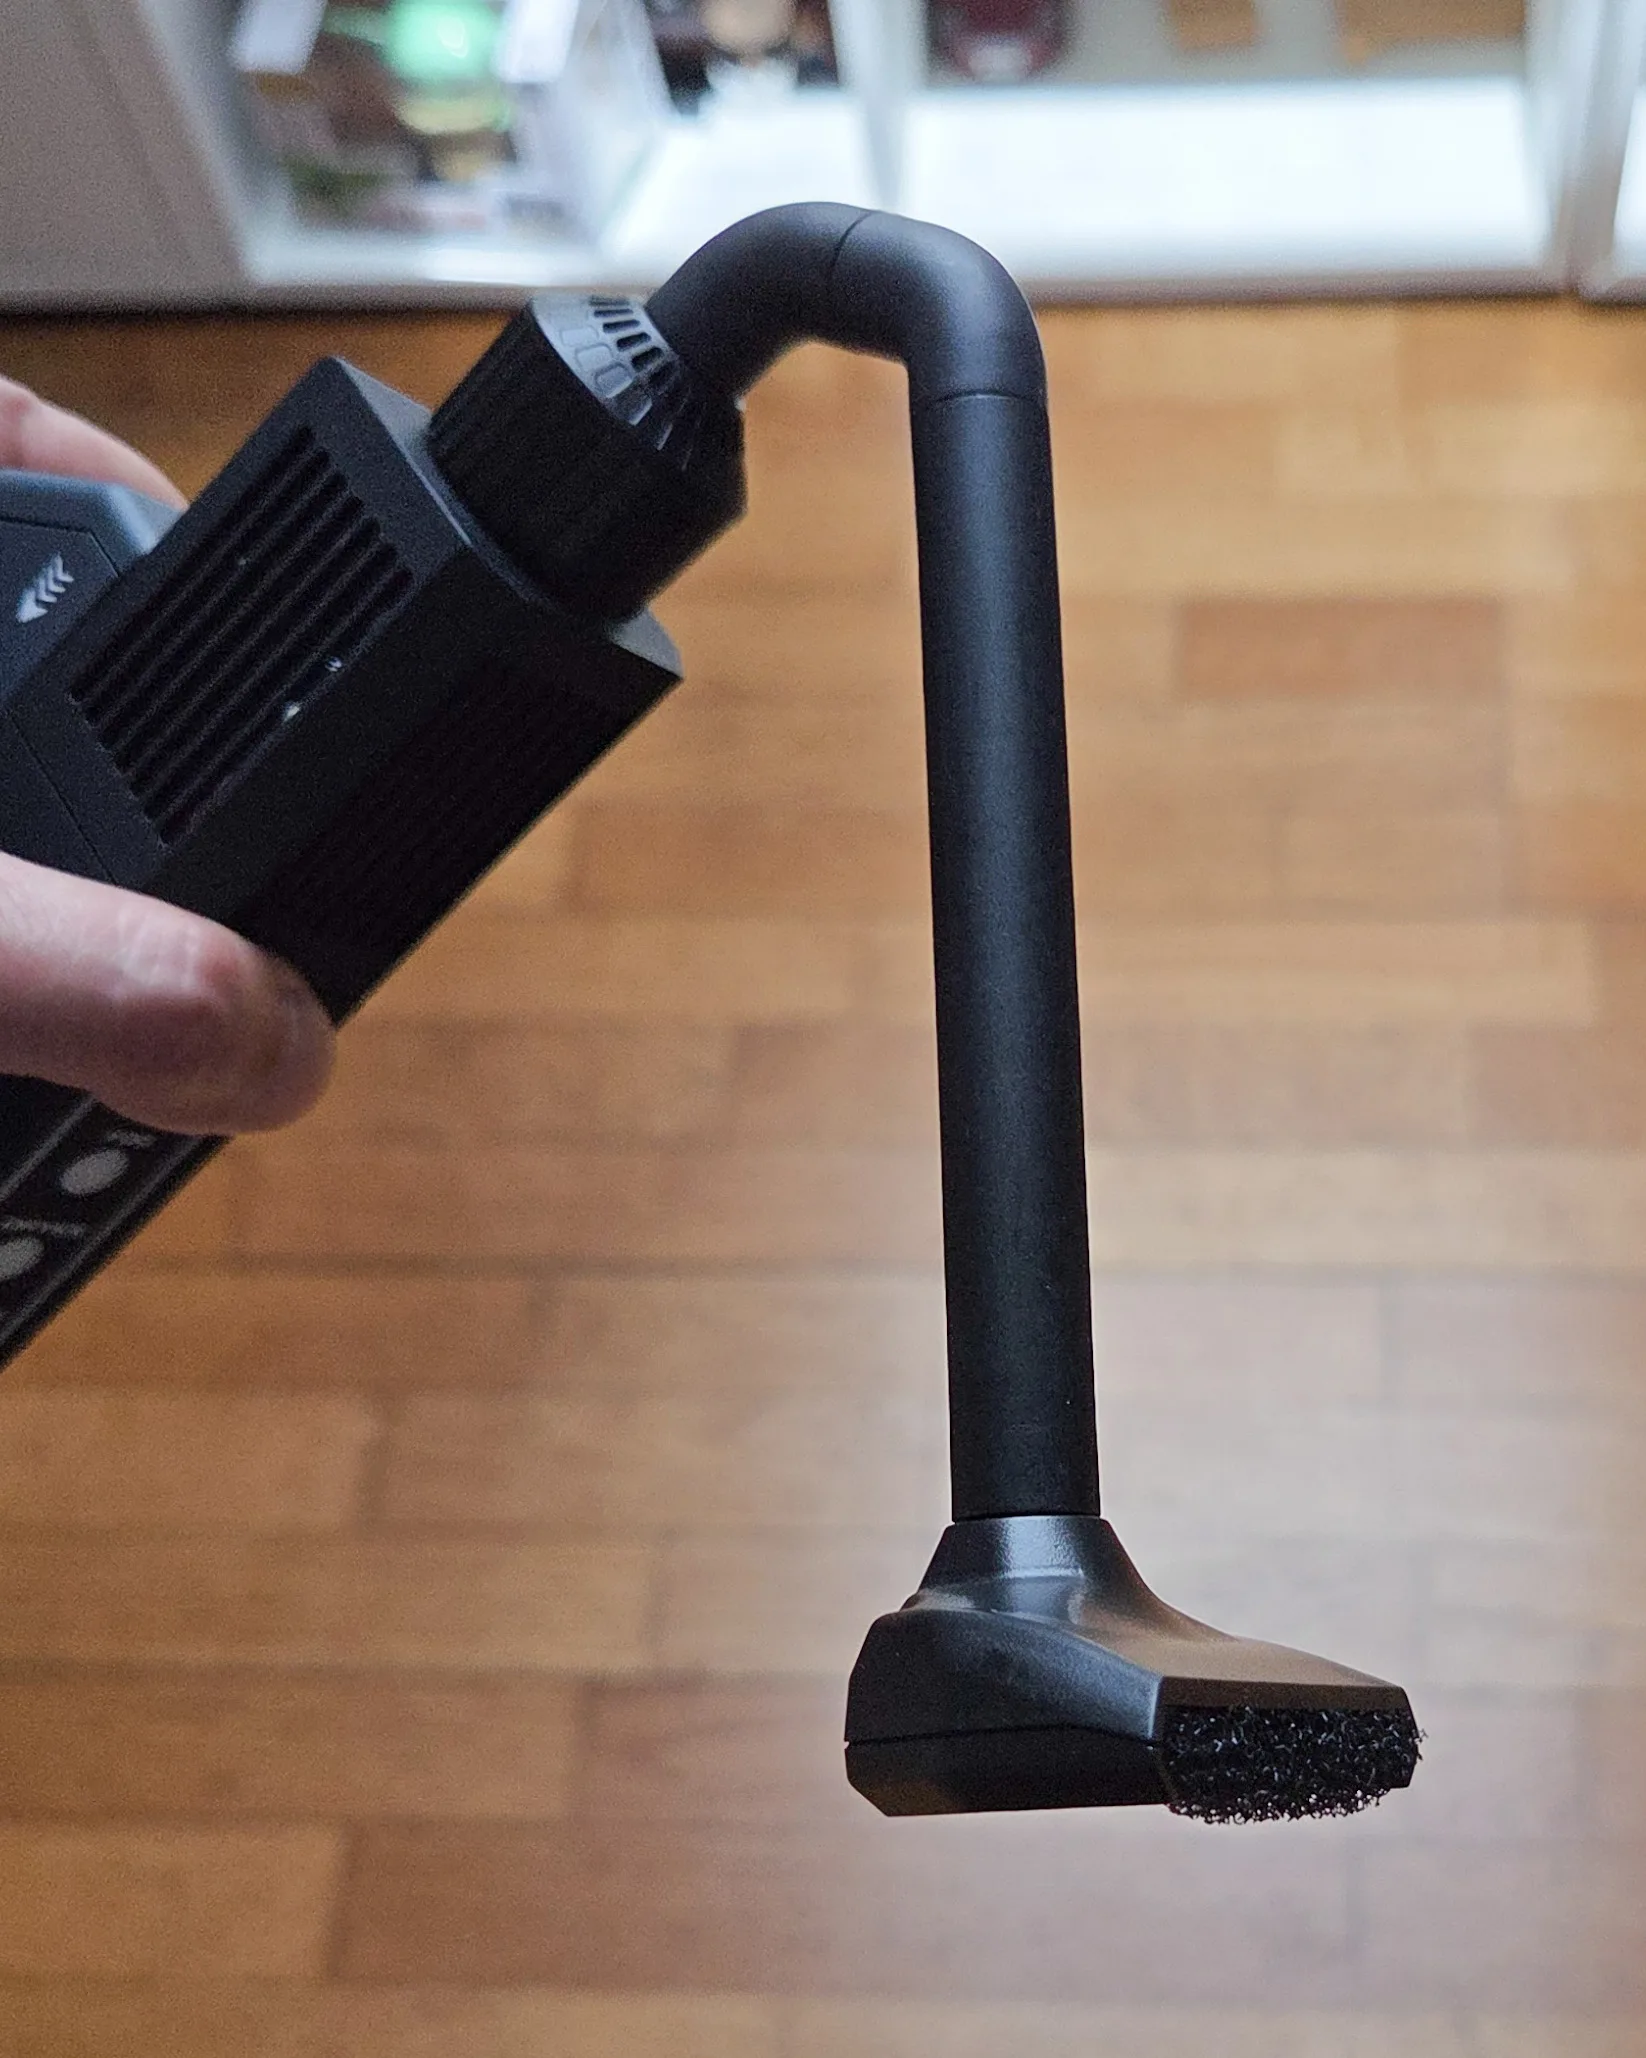
While I was getting the Vanishing Liquid chamber from the SmokeNINJA Pro case for round two, I found a nozzle I didn’t recognize in one of the pouches: a flat-looking one. That turned out to be a tabletop dry ice attachment, which solved a different problem!
With the tube-like dry ice nozzle, you have to place it where you want the effect. Then, when you remove the machine from the scene, that movement creates wisps of smoke on its way out. That means extra work having to mask or clone out any of those unwanted trails in post.
But with the tabletop dry ice nozzle, I could leave the whole device out of frame and use the remote to blanket the surface with a thick layer of fog. That was a huge plus for my workflow.
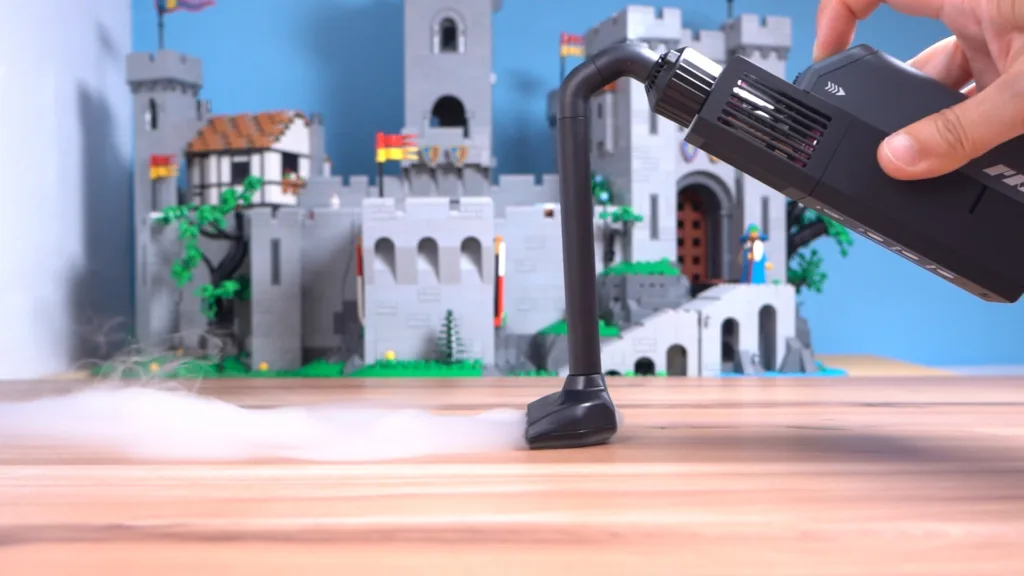
That’s exactly what I used for the pirate boat shot: I put the LEGO boat directly on the tabletop, then set up the SmokeNINJA with the tabletop nozzle just out of frame, running for 2-3 seconds until the surface was fully covered, then took the photo.

I checked the tabletop surface and got the same result: no residue on the tabletop and none on the boat. The claim held.
Light rays with fog effect
For another test, I wanted to capture visible light rays cutting through a scene. I set my overhead video LED panel at a 45° angle and dialed the brightness down low, then pointed my phone flashlight into the lattice windows of the LEGO build to create hard, directional light. That combination of a continuous hard light plus a long shutter and atmospheric effect is really what sells the “god rays” look.
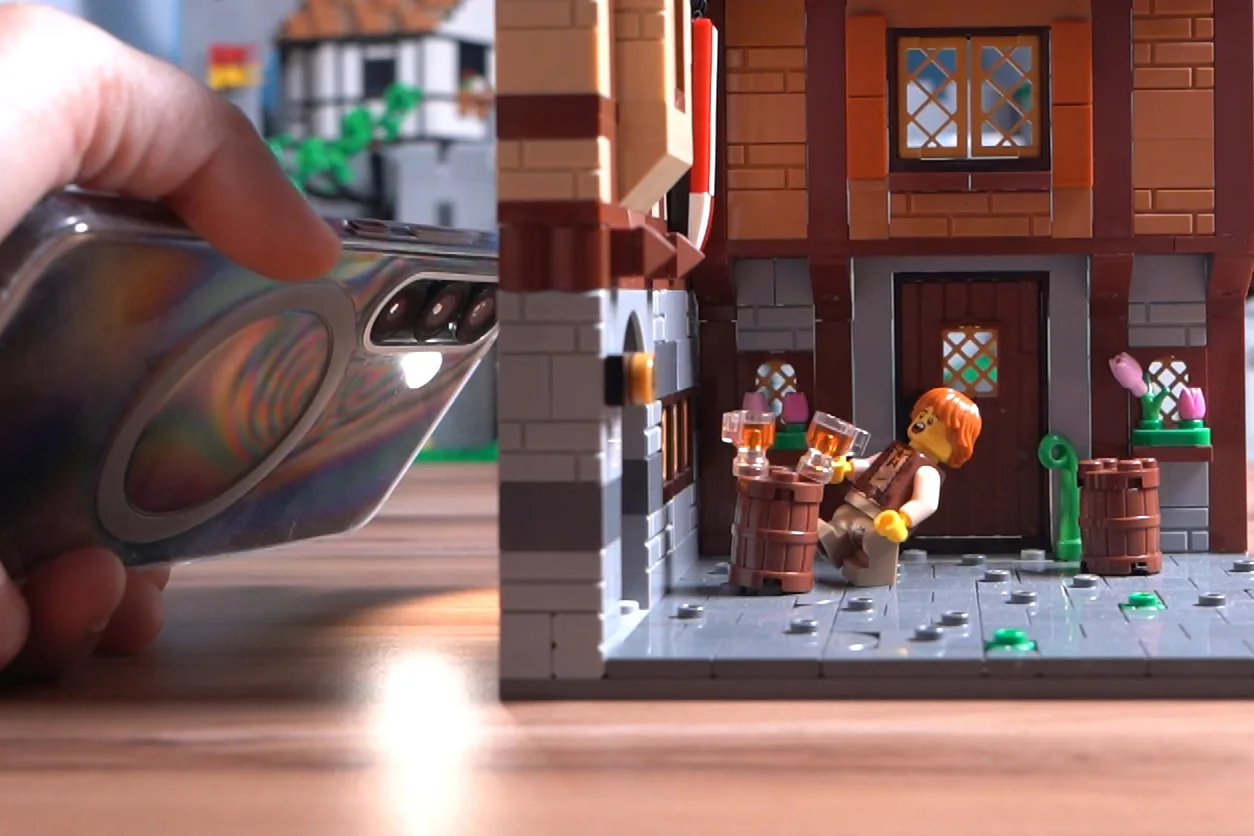
With the camera set to a 1-second exposure and the SmokeNINJA Pro set to Fog, I pumped the Vanishing Formula into the scene for about half a second right before hitting the trigger. Those delays help blend the effect evenly.

A fast shutter would capture visible tendrils of smoke, which isn’t the look I generally want for fog or haze. Because I’m working at LEGO scale, even a small amount of haze can overwhelm a scene quickly, so I also shot a clean baseplate with zero fog and blended it in under a layer mask in Photoshop to knock back haze in spots where I wanted more clarity.
If you want to try this yourself, the setup is simple: push hard light through something with an opening like a window or a door, and use a smoke machine to give that light something to catch. Then shoot a long exposure. This last part matters a lot: a short exposure catches smoke mid-motion as visible wisps, while a long exposure smooths that same smoke into a soft, even haze. That haze is what actually sells the light-ray effect.
Problems solved
Two things made this shoot with the SmokeNINJA Pro with Vanishing Formula Kit noticeably easier than a normal fog session:
No more airing out the studio between shots. Normally, I’m cracking a window and waving a diffuser panel around like a maniac to clear haze before the next frame, especially annoying mid-heatwave when I don’t want the AC fighting a wide open window. With the Vanishing Formula, the fog cleared on its own fast enough that I could just keep shooting.
PMI Gear recommends using a small fan, but with LEGO, I could wave away any lingering smoke with one gesture. I could even blow on the scene and it would be cleared out.
Zero residue anxiety. Anyone who’s photographed minifigs after a fog session knows the dread of checking your build for a greasy sheen. This formula left nothing behind. No slick film on the scene, and just as important, none on my phone, which was sitting right in the blast radius acting as my light source.
PMI’s own claims line up with what I saw in my testing: the Vanishing Formula is engineered to dissipate within an eight-foot radius, which is also why it’s marketed as friendly to photoelectric smoke detectors at that distance.
On the residue front, PMI says the fast-dry formula is built to evaporate quickly off surfaces rather than leaving the sticky buildup you get with traditional fog liquids, and in practice, that’s exactly the difference I felt working this close to the scene.
There is a catch. The Vanishing Formula itself is a kit, and not just a new bottle of juice. The kit pairs the new fluid with dedicated hardware, a special VF chamber and amplifier nozzle, so you can’t just buy a bottle to use with a standard SmokeNINJA setup. You need the kit.
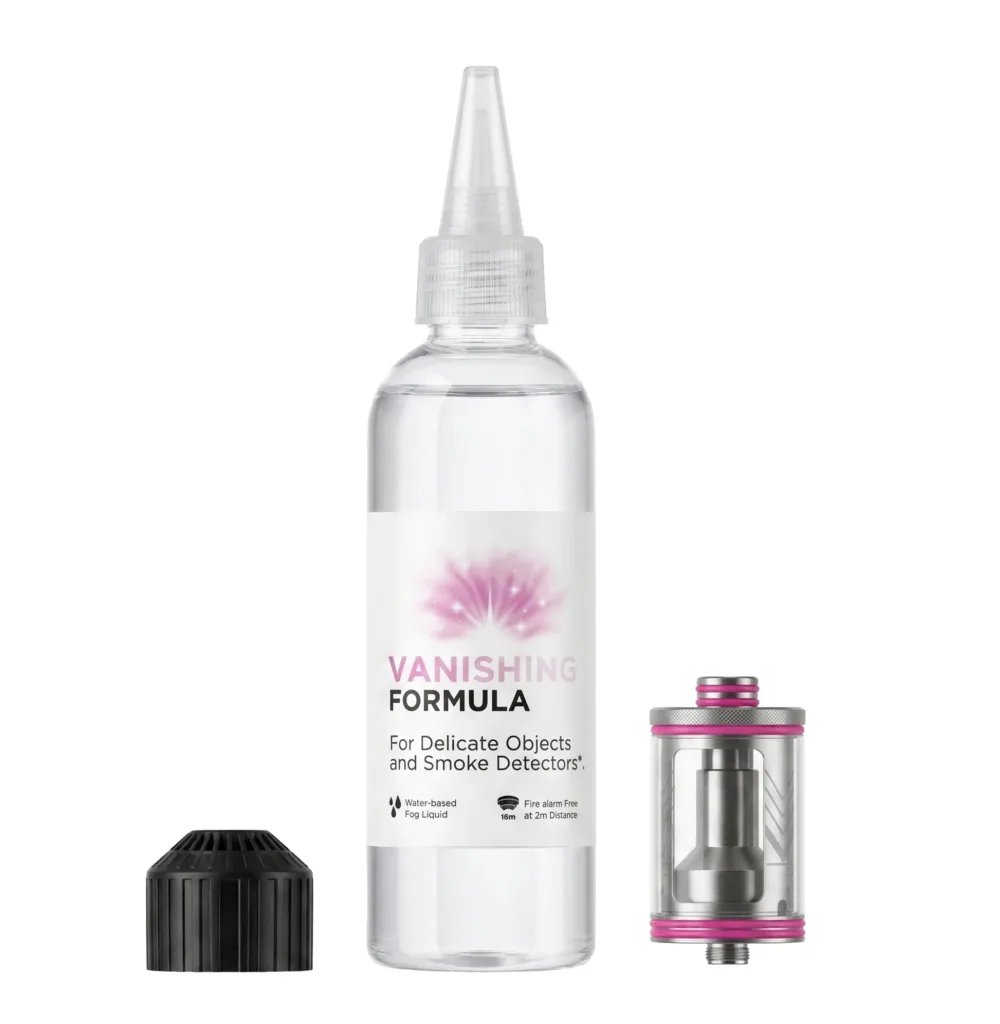
I asked PMI Gear directly if you could buy the Vanishing Formula and use it with any other brand fog machine, and they confirmed it isn’t compatible. I checked the website and they also recommend using the Pro version of the SmokeNINJA, not the regular one (however, the Pro version is cheaper anyway). So if you want the no-residue, no-airing-out benefits, you need both a SmokeNINJA Pro and the Vanishing Formula kit.
Who this is for
If you’re shooting with atmospheric effects at a small scale in an indoor space, doing back-to-back setups, or you just hate cleaning up oily residue, the Vanishing Formula solves real, specific annoyances rather than being a gimmick upgrade.
For studio-based LEGO photography, the SmokeNINJA Pro with Vanishing Formula has earned its place in my toolbox. It didn’t slow down my shoot, didn’t leave a mess, and didn’t have me airing out the space every few minutes. Because of that, I’ll use atmospheric effects a lot more than I did with any of the other smoke devices I own.
The downside is cost. The SmokeNINJA Pro Basic Kit runs about USD $190, substantially more than the Ulanzi FM01. PMI Gear doesn’t offer a dedicated SmokeNINJA + Vanishing Formula Kit (at least not yet), so you’re also paying for the regular Cloud formula and chamber you may never touch. Add the Vanishing Formula kit itself at about USD $70, and you’re looking at USD $260 total.
UPDATE 07/14/2026: PMI Gear launched a Tabletop Creator Bundle that includes the SmokeNINJA Pro, Vanishing Formula Kit, and Tabletop Nozzles. They’ve also given me a code FOURBRICKSTALL for 45% off the bundle until July 28 (this is not an affiliate code).
It’s worth pointing out that PMI Gear created the portable fog machine category with the original SmokeNINJA back in 2022, and safety is clearly a priority in their design. That’s important given these devices heat up fast and emit particles close to the subject (and the photographer). If you have kids around (as toy photographers often do), you’ll probably want to invest in the safest fog device around.
Bottom line: if you’d rather focus on shooting with special atmospheric effects than cleaning them up, the SmokeNINJA Pro plus Vanishing Formula kit is for you.
This kit was provided by PMI Gear for review.